Manage Multiple Gmail Accounts
Getting set up with Gmail is a simple process and can be done in under 10 minutes. There are numerous benefits to using Gmail to handle your email that include, web accessibility and being able to access your account from multiple locations and keep your inbox intact. But did you know you can also set up your Gmail account to send and receive emails from your other accounts?
I’ve got Gmail set up to handle all of my various email accounts in one place. Previously I had to use Outlook, or Thunderbird to be able to manage multiple accounts in one place, but it wasn’t reconciled between computers and it was a mess on any other computer other than my main computer.
This means that I can send and receive emails from all of my different accounts and keep it all consolidated in one place that is accessible wherever I go.
Here is how you can use Gmail to manage multiple email accounts.
If you haven’t already done so, go over to Gmail and get signed up for an account. This account will also be the primary account that you can use to access Google Analytics, Google Webmaster Tools, Picasa, Google +, etc.
Log in to your Gmail account and go to your settings. Click on that gear wheel button then down to settings.
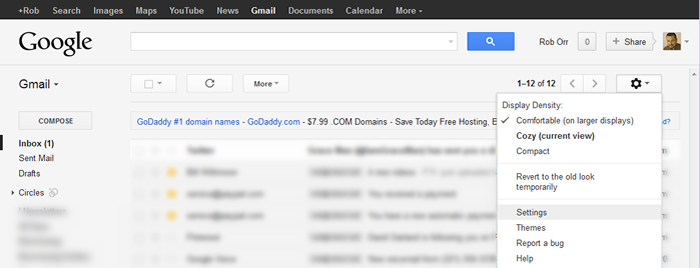
Once you’re in your settings, you’ll see several tabs available to you across the top. What you see should look similar to what you see here.

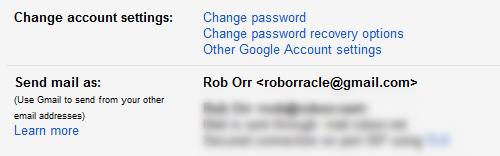
Click on the accounts tab, and go down to where it says “Send mail as” and since you’re looking to add a new email address click where it says, “Add another email address you own.” Click on that link and you’ll get a dialog box that will walk you through the next steps to get it finished.
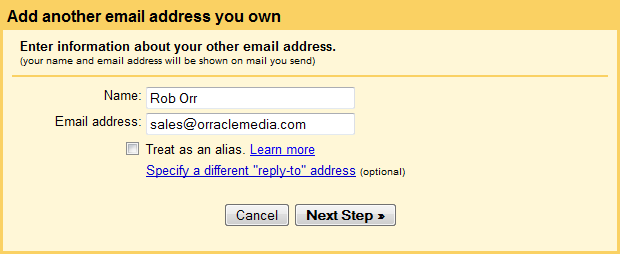
My personal preference is to send my mail through my mail servers, so I select the bottom option to “send through mydomain.com SMTP servers.”
That should open a couple fields for your to be able to input your mail settings. You want to input your settings like this:
SMTP Server: mail.YOURDOMAIN.com
Username: username@YOURDOMAIN.com (input your full email address)
Password: whatever password you’ve set
Leave the secured connection as TLS
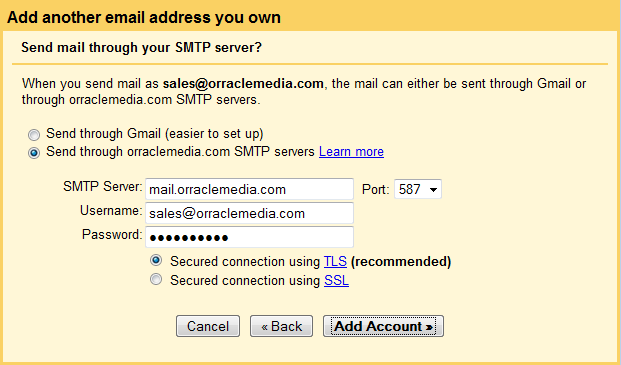
The next step will be to get a verification email sent to the address you are adding, so click on “Send Verification.” To get this confirmation, log in to your email and get the confirmation code.
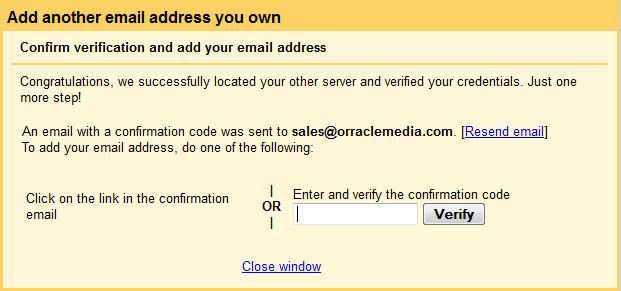
Next you’ll be presented with a screen to enter your verification code, so enter it here.
And that’s it for sending email using another email account in Gmail. Let’s continue and talk about how to receive emails using your Gmail account.
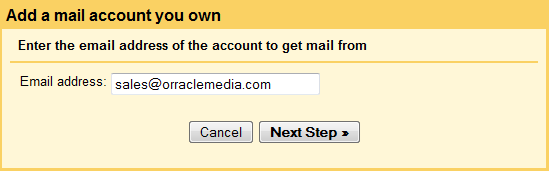
Once you’ve finished adding your “Send mail as” account you’ll be taken back to your main accounts tab and your new email address will be listed there. To receive emails through Gmail go to the section below “Check mail using POP3” and select “Add a POP3 mail account you own”. That brings up the dialog box where you can add the address you just added above. Add your full email address and click on “Next Step”.
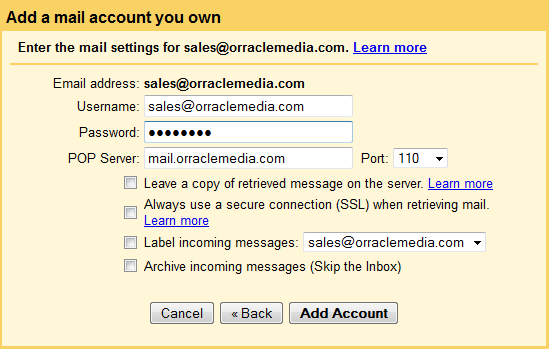
In this section, you will want to add your full email address, password, and select whether or not you want a copy of the message to be left on the server, add a label, etc. I wouldn’t recommend leaving a copy on the mail server as you can run in to capacity issues with your mail service leaving all those message there, and you don’t have to set up any filters at this point, so you can just leave those boxes unchecked, then click on “Add Account”, and that’s it.
By the way, you can only have a maximum of five email accounts through which you receive email set up in Gmail. To overcome this, I recommend forwarding mail from any extra accounts to one of the five you already have set up.
It’s really not too bad at all! It only takes a few minutes to set up. Gmail will start to check your mail for you immediately. It’s incredibly easy to use!